## Getting started with High Performance Computing in Research _Richard Polzin <rpolzin@ukaachen.de\>_ ###### Last Updated: 19. Aug 2026 --- ### Table of Content 1. Introduction <!-- .element: class="fragment" data-fragment-index="1" --> 2. Getting Access & Connecting <!-- .element: class="fragment" data-fragment-index="2" --> 3. Linux Basics for HPC <!-- .element: class="fragment" data-fragment-index="3" --> 4. SLURM Job Manager <!-- .element: class="fragment" data-fragment-index="4" --> 5. Compute Time Application <!-- .element: class="fragment" data-fragment-index="5" --> 6. Tips and Tricks <!-- .element: class="fragment" data-fragment-index="6" --> --- # Introduction <!--v--> ### Objectives - Understand what HPC is - Learn why HPC is essential for modern research - Discover available HPC resources - Walk through a project application process <!--v--> <!-- .slide: data-auto-animate --> ## What is HPC?<!-- .element: data-id="code-animation"--> - **H**igh **P**erformance **C**omputing involves the use of supercomputers and parallel processing techniques to solve complex computational problems - Combines computing resources for higher performance - HPC Systems consist of clusters with interconnected nodes - Enable processing larger datasets and complex simulations <!--v--> <!-- .slide: data-auto-animate --> ## What is HPC?<!-- .element: data-id="code-animation"-->  <!--v--> ## Why is HPC Essential? - **Speed:** Reduces time to results - **Capacity:** Handle large scale data and simulation - **Complexity:** Solve problems to complex for standard computers <!--v--> <!-- .slide: data-auto-animate --> ## HPC Resources<!-- .element: data-id="code-animation"--> - **State of the art** HPC facilities are available through the National High Performance Computing (NHR) network - Including Compute Clusters, Large Scale Storage, and advanced networking infrastructure <!--v--> ## Access Eligibility and Requirements - Researchers, students, and collaborators from German Universities - University credentials (TIM-ID) are required - Compliance with university and HPC usage policy is expected - Resources are to be used responsible <!--v--> <!-- .slide: data-auto-animate --> ## HPC Resources<!-- .element: data-id="code-animation"--> 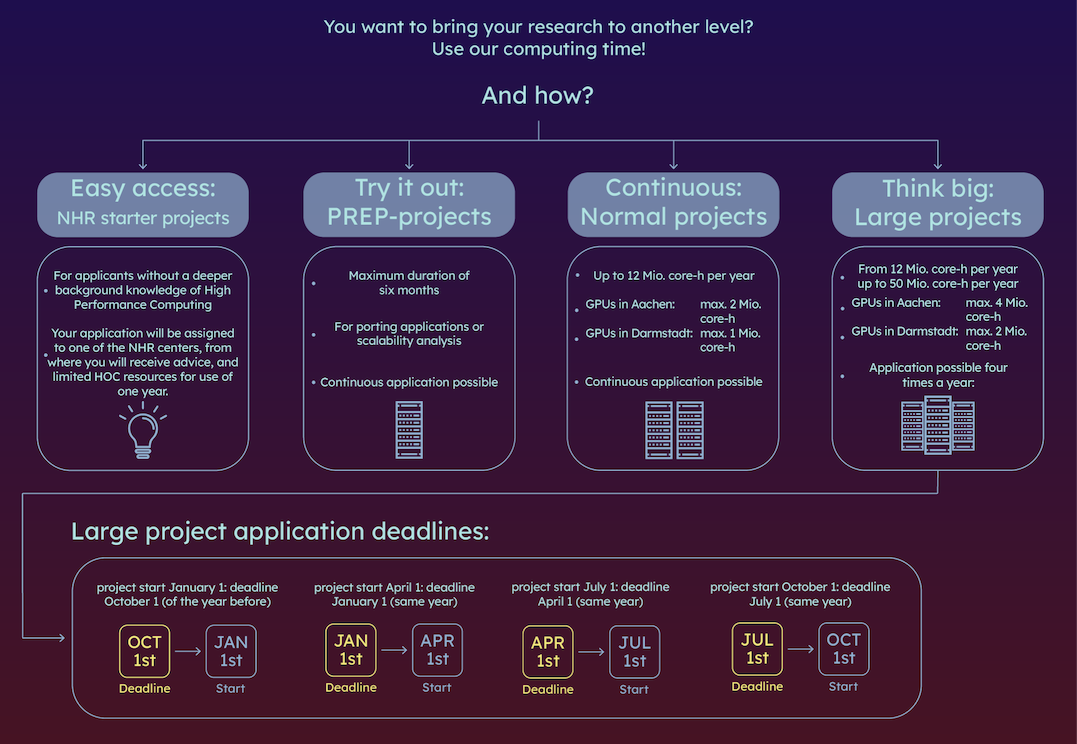 <!--v--> <!-- .slide: data-auto-animate --> ## The RWTH Compute Cluster <!-- .element: data-id="code-animation"--> Per Node: - 2x Intel Xeon 8468 (48 core CPU) - 1.5 TB local SSD Storage - 256GB - 1,024GB of RAM - 632 such nodes available <!--v--> <!-- .slide: data-auto-animate --> ## The RWTH Compute Cluster <!-- .element: data-id="code-animation"--> Per Node (ML): - 2x Intel Xeon 8468 - 695 GB local SSD Storage - 512GB of RAM - 4 x NVIDIA H100 GPU (96GB HBM2e) - 52 such nodes available --- # Getting Access & Connecting <!--v--> ### Account Creation Use Selfservice to create your account (https://idm.rwth-aachen.de/selfservice/) 1. Accounts and Passwords 2. Account Overview 3. Create HPC Account <!--v--> <!-- .slide: data-auto-animate --> ### Login ```zsh ssh ab1234@login23-1.hpc.itc.rwth-aachen.de ``` - Login with secure shell (ssh): **ssh username@host** - Needs **VPN** if not connected to eduroam — see [help.itc.rwth-aachen.de](http://help.itc.rwth-aachen.de) → "VPN" - Different node types available for different use cases (see next slide) <!--v--> ### Cluster Access Nodes Use the appropriate node for your task. Be considerate of shared resources. - Login Nodes - lightweight tasks (script editing, testing) - Copy Nodes - Optimized for data transfer <!--v--> 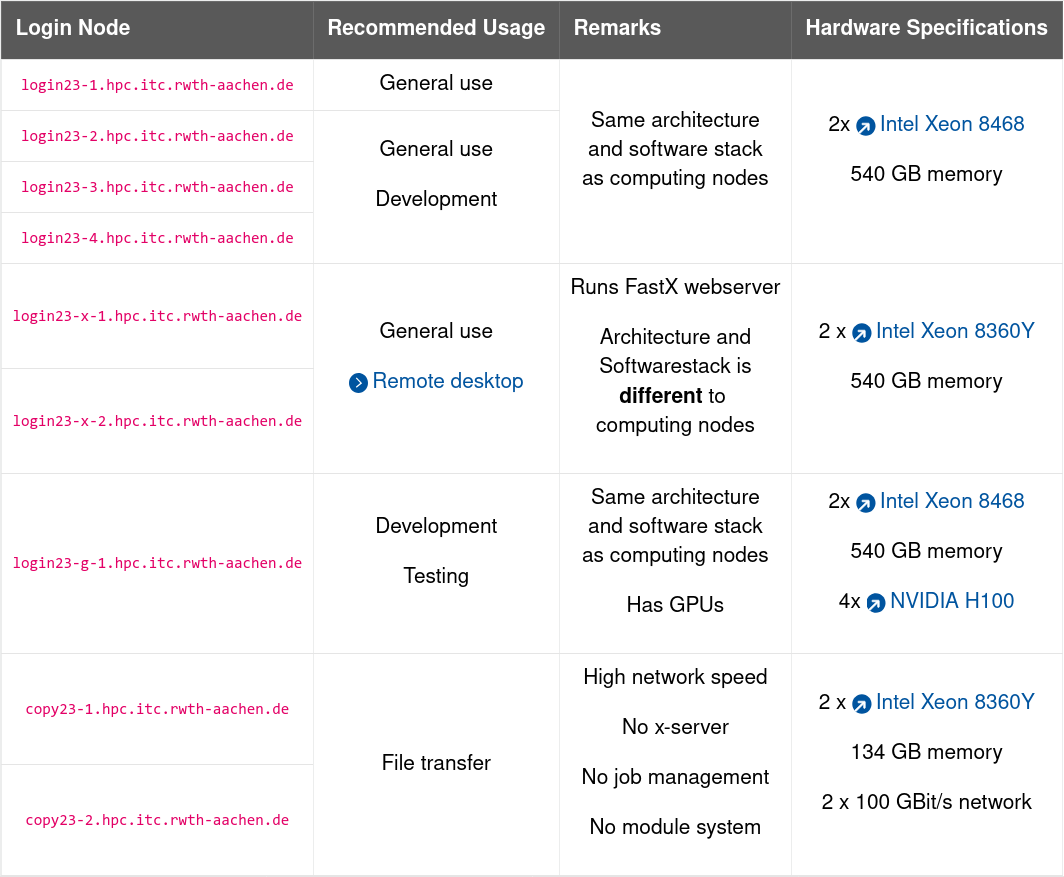 <!-- .element height="80%" width="80%" --> <!--v--> ### SSH Configuration Typing the full hostname every time is tedious. Save presets in `~/.ssh/config`: ```text [1-3] Host claix HostName login23-1.hpc.itc.rwth-aachen.de User ab123456 ``` Then just use the alias: ```bash [1|2] ssh claix # short alias — no hostname needed ssh -X claix # with X11 forwarding for graphical apps ``` <!--v--> ### Mounting the Cluster Filesystem With `sshfs` you can browse cluster files in your local file manager: ```bash [1|2] sshfs ab123456@copy23node:/home/ab123456 /mnt/clusterhome sudo umount -l /mnt/clusterhome # unmount when done ``` > Copy nodes (`copy23node`) are optimised for data transfer — always use them for large file moves. <!--v--> ### SSH Keys — Skip the Password Use a **public/private key pair** instead of a password — more convenient, more secure. ```bash [1-3|5-7|9-10] # 1. Generate a key pair (on your local PC) ssh-keygen -t ed25519 # → id_ed25519 (private) and id_ed25519.pub (public) in ~/.ssh/ # 2. Copy public key to cluster ssh-copy-id -i ~/.ssh/id_ed25519.pub claix # Windows: paste contents of .pub into ~/.ssh/authorized_keys on cluster # 3. Log in — key used automatically ssh claix ``` > Use one key per device — if a laptop is stolen, remove just that key from `~/.ssh/authorized_keys`. <!--v--> ### The File Systems - **$HOME:** Small quota, backed up. For scripts and small files. - **$WORK:** Large quota, not backed up. For working with many small files. - **$HPCWORK:** Largest quota, not backed up. For I/O intense jobs and large files. ```sh quota -s # check your current usage against each quota ``` <!--v--> 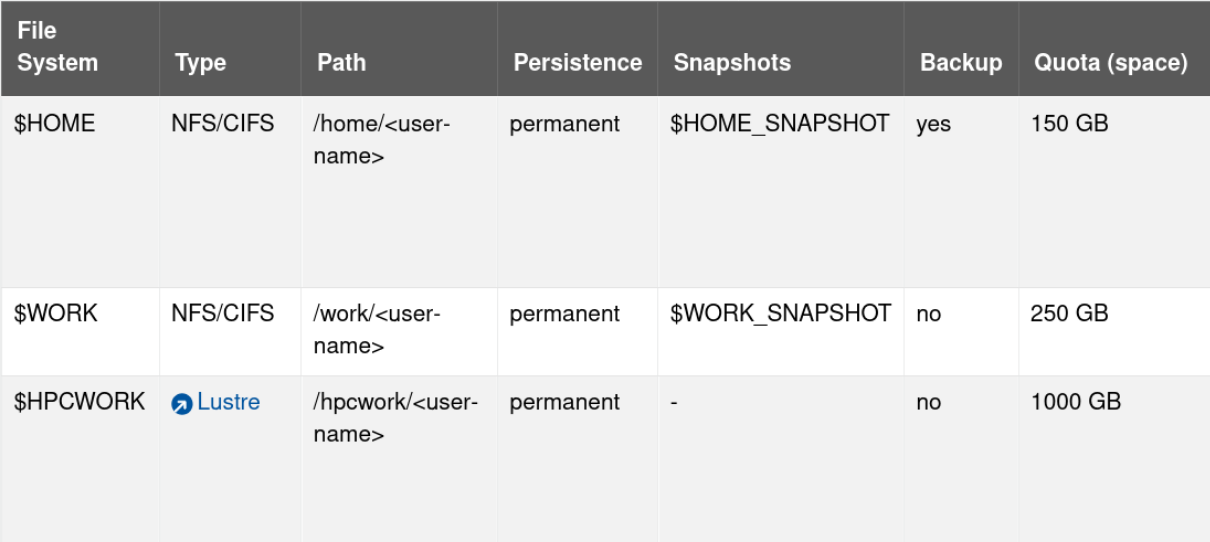 <!--v--> ### Data Transfer Methods - Use copy nodes for data transfer - Consider data security and encryption - Terminal: *scp* or *rsync* - Mount as folder: *sshfs* <!--v--> ### Project Management: Groups - Groups are created for every project - Every group consists of owners (PC/PI), Managers and Members - Granted computation time and storage space is shared through groups - In Aachen project storage is deleted **8 months** after a project's conclusion. Make sure you migrate the data by then! <!--v--> ### Project Management: Commands Users can be added to and removed from groups/projects using their TIM-ID. ```text member add --name <project-id> <user-id> member delete --name <project-id> <user-id> member finger # view group affiliations ``` - append **--manager** to any command above to assign or revoke the manager role --- <!-- .slide: data-auto-animate --> ## The Command Line <!--v--> ### Why Linux? Linux is everywhere — you just don't always see it: | Domain | Linux share | |---|---| | Supercomputers (Top 500) | **100%** | | Web servers | ~96% | | Cloud infrastructure (AWS, Azure, GCP) | ~90% | | Android smartphones | ~71% of mobile OS market | | Desktop PCs | ~4% | **~4 billion Linux devices** in active use (2024) — most backend infrastructure, cloud, and CI/CD runs on Linux. > On HPC you will always be on Linux — whether you use Windows or macOS at home. <!--v--> ### What is the Shell? - A text interface where you type commands — also called **CLI**, terminal, or console - **Advantages:** always available, scriptable, fast, works over SSH - **Disadvantage:** no buttons — you need to know the commands The shell is a program itself. On a cluster you're running a shell *inside* an SSH session — **closing the session kills everything running in it.** > Default shell on most systems (including RWTH): **bash** <!--v--> ### Reading the Prompt ```text [js056352@login1 ~]$ ``` | Part | Meaning | |---|---| | `js056352` | Your username | | `login1` | Hostname — which machine you're on | | `~` | Current directory (`~` = your home) | | `$` | Ready for input (`#` = you are root — be careful) | <!--v--> ### Anatomy of a Command ```sh [1|2|3] $ hostname -f login1.cm.cluster $ ``` - **Command** — what to do - **Options** — short (`-t`) or long (`--time`): `sbatch -t 0:30:00` ≡ `sbatch --time 0:30:00` - **Output** — printed below; format varies by command - New `$` prompt = done. **Case-sensitive** — `ls` ≠ `LS`. <!--v--> ### Essential Shortcuts | Key | Action | |---|---| | `Tab` | Auto-complete command or path | | `Tab Tab` | List all possible completions | | `↑ / ↓` | Navigate command history | | `Ctrl-C` | Abort running command | | `Ctrl-Z` | Suspend command (resume with `fg`) | | `Ctrl-D` | Exit shell / send end-of-input | **When stuck: `Ctrl-C` gets you back to a prompt.** <!--v--> ### Getting Help — and Staying Safe **Finding the right command:** ```text [1|2] man <command> # full manual page — press q to quit <command> --help # quick reference ``` **The console has no Undo:** - rm deletes immediately — no recycle bin, no undo <!-- .element: class="fragment" --> - Never run a command you don't understand <!-- .element: class="fragment" --> - Always check your working directory before destructive commands <!-- .element: class="fragment" --> - Avoid running as root unless explicitly required <!-- .element: class="fragment" --> <!--v--> ### Processes A **process** is a running instance of a program — has a unique **PID**, inherits owner's permissions. ```text [1|2] top # live CPU/memory view — q to quit, u to filter by user kill <PID> # terminate a process ``` **Foreground and background:** ```sh command & # start in background # Ctrl-Z # suspend foreground process bg / fg # resume in background / bring to foreground jobs # list background jobs ``` > On HPC, SLURM manages processes — but you need this when something hangs on a login node. --- <!-- .slide: data-auto-animate --> ## Directory Structure <!--v--> ### The Linux Filesystem No drive letters — everything lives under one tree rooted at `/`: ```text / ├── bin ← System programs (ls, bash, …) ├── etc ← Configuration files ├── home ← User home directories ← the only place you can write │ └── ab123456/ ├── tmp ← Temporary files (cleared on reboot) └── var ← Logs and runtime data ``` - **Absolute path** starts with `/`: `/home/ab123456/data` - **Relative path** is relative to where you are: `../data` - `pwd` — print your current location - Shortcuts: `.` (here) · `..` (parent) · `~` (your home) <!--v--> ### Navigating ```bash [1|2|3|4] cd /work/ab123456 # change directory (absolute path) cd .. # go up one level cd ~ # go to your home directory cd - # go back to previous directory ``` `pwd` prints your current location. `which <command>` shows where a command lives. <!--v--> ### Listing Files ```bash [1|2|3|4] ls # list files ls -l # long format: permissions, size, date ls -la # include hidden files (names starting with .) ls -lt # sort by modification time ``` --- <!-- .slide: data-auto-animate --> ## Files <!--v--> ### Working with Files Extensions don't matter to Linux — use `file <name>` to identify type. Key distinction: **text files** (editable, searchable) vs **binary files**. | Command | Action | |---|---| | `mv <old> <new>` | Move or rename | | `cp <src> <dest>` | Copy (`-r` for directories) | | `mkdir <name>` | Create directory | | `touch <name>` | Create empty file / update timestamp | | `rm <name>` | Delete (`-r` for directories, `-f` to skip prompts) | > ⚠ No undo — `rm` deletes permanently. Double-check before `rm -rf`. <!--v--> ### Wildcards (Globbing) Select files by pattern — the shell expands them before the command runs: | Pattern | Matches | |---|---| | `*` | Any string (including empty) | | `?` | Exactly one character | | `[abc]` | One character from the set | ```bash rm *.log # delete all .log files ls report_?.txt # list report_1.txt, report_2.txt, … ``` <!--v--> ### The `find` Command ```sh [1|2|3] find . -name "*.log" -type f # find by name find . -type f -mtime -7 # modified in last 7 days find . -name "*.log" -exec rm {} \; # act on results ``` > Always **quote** wildcard patterns passed to `find` — otherwise the shell expands them first before `find` sees them. --- <!-- .slide: data-auto-animate --> ## Text, Streams, and Search <!--v--> ### Streams and Redirection Every process has three streams: **stdin** (input) · **stdout** (output) · **stderr** (errors). ```sh [1|2|3|4] command > file # write stdout to file (overwrites) command >> file # append stdout to file command 2> file # write stderr to file command > out 2> err # stdout and stderr to separate files ``` **Pipes** — chain commands, passing stdout of one into stdin of the next: ```sh cat results.txt | grep "ERROR" | sort | uniq -c ``` <!--v--> ### Viewing Files ```text [1|2|3|4] cat <file> # print whole file less <file> # scrollable viewer — q to quit, / to search head -n 20 <file> # first 20 lines tail -f <file> # last lines, live-updating (great for log files) ``` > `less` is your friend for large files — it doesn't load the whole thing into memory. <!--v--> ### Searching with `grep` ```bash [1|2|3] grep "ERROR" results.txt # find matching lines grep -r -i "error" logs/ # recursive, case-insensitive grep -n -l "TODO" *.py # show line numbers / list matching filenames ``` - `-r` — recurse into directories - `-i` — case-insensitive - `-n` — prefix output with line numbers - `-l` — list only filenames that match --- <!-- .slide: data-auto-animate --> ## Users and Permissions <!--v--> ### Reading Permissions Linux is multi-user: every file has an **owner**, a **group**, and permissions for three audiences. ```text [1|2] drwxr-xr-x js056352 hpc-group 4096 testdir/ -rw-r--r-- js056352 hpc-group 85 script.sh ``` ```text [type][user][group][other] d rwx r-x r-x ← dir: owner can write; others can read+enter - rw- r-- r-- ← file: owner can write; others read-only ``` <!--v--> ### Permission Bits | Bit | On a file | On a directory | |---|---|---| | `r` | Read | List contents (`ls`) | | `w` | Modify | Create / delete inside | | `x` | Execute | Enter (`cd` into) | `ls -l` shows permissions for: **[type][owner][group][others]** <!--v--> ### Changing Permissions ```sh [1|2|3|5|6] chmod u+x script.sh # make executable for owner chmod go-w file.txt # remove write for group and others chmod a+r file.txt # make readable for everyone chown newuser file # change owner (requires root) chown user:group file # change owner and group ``` Format: `[u/g/o/a] [+/-] [r/w/x]` > On HPC: **"permission denied"** and **quota exceeded** are the two most common filesystem errors. --- <!-- .slide: data-auto-animate --> ## The vim Text Editor <!--v--> ### Three Modes — This Is the Key Insight vim is always available on any Linux system. **When lost: press `Esc` repeatedly, then `u` to undo.** ```text Normal Mode ← start here, always return here with Esc / \ press : press i / a / o ↓ ↓ Command Mode Insert Mode (:w :q :wq :q!) (type text normally) ``` <!--v--> ### Opening, Editing, Saving ```vim [1|2|3|5|6|7] vim script.sh " open a file i " enter Insert mode — type normally Esc " return to Normal mode :w " save :wq " save and quit :q! " quit WITHOUT saving ``` <!--v--> ### Normal Mode Shortcuts | Key | Action | |---|---| | `dd` / `yy` / `p` | Cut / copy / paste line | | `u` / `Ctrl-r` | Undo / Redo | | `/pattern` → `n` | Search forward | | `:%s/old/new/g` | Replace all in file | > `Esc` always returns you to Normal mode — when lost, press `Esc` first. <!--v--> ### Alternatives - **`nano`** — keybindings shown at the bottom; good default for beginners - **VS Code** with Remote SSH extension — full IDE experience on the cluster - **MobaXTerm** (Windows) — has a built-in file editor > Use `nano` for quick config edits. Learn vim properly only if you spend significant time in the terminal. --- <!-- .slide: data-auto-animate --> ## Shell Scripts <!--v--> ### Anatomy of a Shell Script A shell script is a text file of commands — the simplest form of automation. ```bash [1|2-3|5|6-7|9-10] #!/bin/bash # Shebang — must be first line, tells Linux which interpreter to use # #SBATCH directives (seen later) also use this comment syntax echo "Starting..." # print to stdout — useful for logging ls -l chmod u+x myscript.sh # make executable ./myscript.sh # run — ./ needed because shell only searches $PATH ``` <!--v--> ### Variables ```bash [1-2|4|5-7] name="world" # assign — no spaces around = echo "Hello $name" # use with $ result=$(hostname) # $() captures command output into a variable # Quoting matters: echo '$name' # literal: $name echo "$name" # expands: world ``` <!--v--> ### Script Arguments Passed positionally — `$1`, `$2`, … (`$0` = script name, `$@` = all args): ```bash # ./submit.sh 8 24:00:00 → cores=8, walltime=24:00:00 cores=$1 walltime=$2 sbatch --cpus-per-task=$cores --time=$walltime myjob.sh ``` <!--v--> ### Loops and Conditionals ```bash [1-3|5-7] for f in *.txt; do echo "Processing $f" done if [ -e "$filename" ]; then echo "$filename exists." fi ``` - Shell scripts are great for pipelines and automation glue - For complex logic, data structures, or debugging — use **Python** instead > Always write `#!/bin/bash` explicitly — never assume the user's shell. --- <!-- .slide: data-auto-animate --> ## Environment Variables <!--v--> ### Environment Variables A set of named variables available to the shell and all child processes. Convention: `ALL_CAPS`. ```bash [1|2|3|4] env # list all environment variables echo $HOME # your home directory echo $USER # your username export MY_VAR="value" # create + export to child processes ``` <!--v--> ### The PATH Variable **`PATH`** — directories the shell searches for commands, `:` separated, first match wins: ```bash [1|2] echo $PATH export PATH="$HOME/bin:$PATH" # prepend your own scripts directory ``` Similar variables: `PYTHONPATH`, `LD_LIBRARY_PATH`, `CUDA_HOME`, … <!--v--> ### Environment Modules On HPC clusters, different users need different software versions → **environment modules** ```bash module avail # list available modules module load openmpi/gcc/64/1.10.3 # load a module module list # show currently loaded modules module unload openmpi/gcc/64/1.10.3 # unload when done ``` - Each module prepends to `PATH` and sets related variables - Loading a module **never affects other users** - Always load modules in your **job script** — never rely on interactive session state --- <!-- .slide: data-auto-animate --> ## System Configuration <!--v--> ### Personalizing Your Shell Settings made in the terminal are **temporary** — they disappear on logout. To make them permanent, add them to `~/.bashrc`: ```bash [1-3|5-6|8] # Aliases — shortcuts for long commands alias ll='ls -l' alias grep='grep --color=auto' # Custom PATH export PATH="$HOME/bin:$PATH" source ~/.bashrc # apply changes without logging out ``` Other config files: `~/.bash_profile` (login shells) · `~/.vimrc` (vim) · `~/.ssh/config` (SSH) > **Caution:** a syntax error in `~/.bashrc` can prevent login — test with `bash --norc` if you break it. <!--v--> ### Locales Linux uses **locales** for language, encoding, and date/number formatting. Mismatched locales can cause subtle bugs (wrong sort order, garbled text output). ```bash [1|2] locale # show current settings echo $LANG # e.g. de_DE.UTF-8 or en_US.UTF-8 ``` If a program behaves unexpectedly with text — check your locale: ```bash export LANG=en_US.UTF-8 ``` --- <!-- .slide: data-auto-animate --> ## SLURM Job Manager <!-- .element: data-id="code-animation"--> **S**imple **L**inux **U**tility for **R**esource **M**anagement - Job scheduler often used in supercomputers and compute clusters <!-- .element: class="fragment" data-fragment-index="1" --> - Provides many advantages for utilizing HPC hardware with many users, such as.. <!-- .element: class="fragment" data-fragment-index="2" --> - ... Accounting, Containerization, Priorities, Chain- and Array-Jobs, ... <!-- .element: class="fragment" data-fragment-index="2" --> <!--v--> <!-- .slide: data-auto-animate --> ## SLURM Job Manager <!-- .element: data-id="code-animation"--> - Users can interact with SLURM from login nodes <!-- .element: class="fragment" data-fragment-index="1" --> - Users may request cores, memory and time, then send their programs to be queued <!-- .element: class="fragment" data-fragment-index="2" --> - SLURM reserves these resources and waits till they are available <!-- .element: class="fragment" data-fragment-index="3" --> - Once available, the code will then be run <!-- .element: class="fragment" data-fragment-index="4" --> <!--v--> <!-- .slide: data-auto-animate --> ## SLURM Job Manager <!-- .element: data-id="code-animation"--> 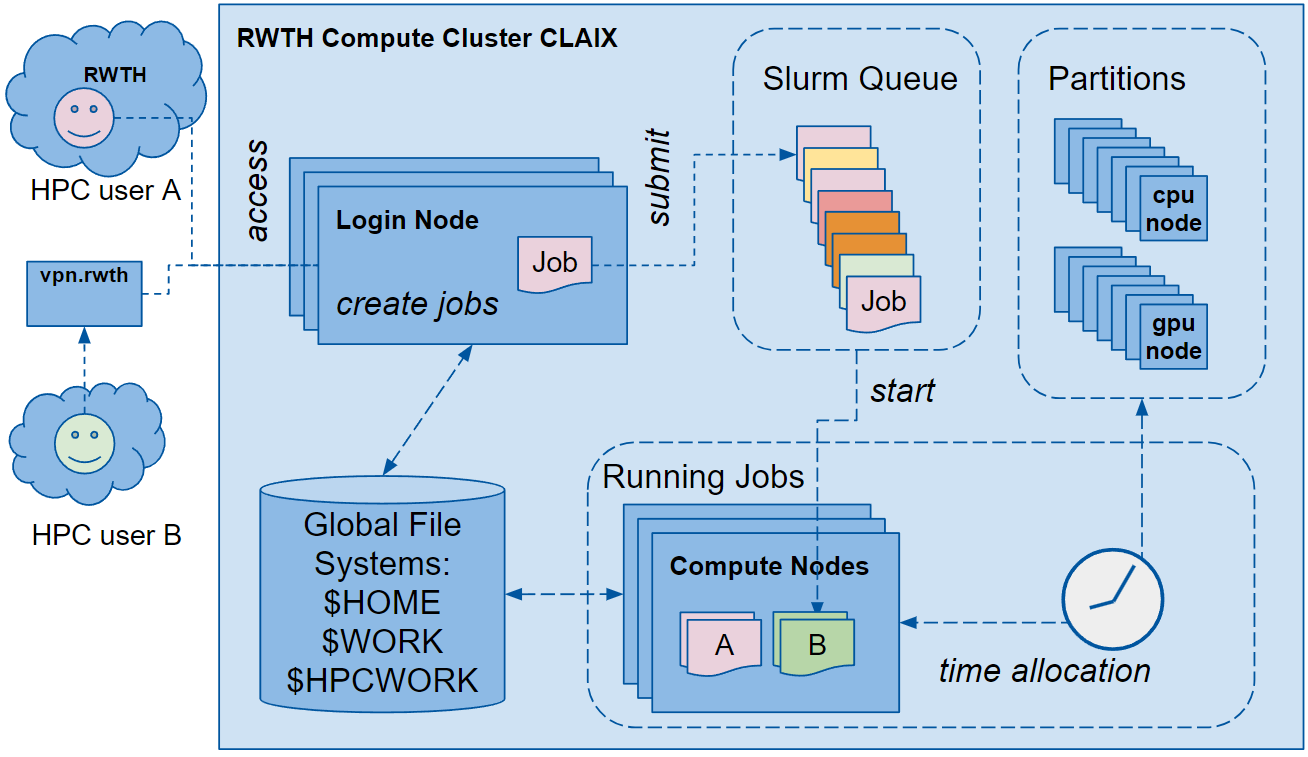 <!--v--> <!-- .slide: data-auto-animate --> ## SLURM Job Manager <!-- .element: data-id="code-animation"--> SLURM is fed **jobscripts**, which contain all information the scheduler needs to run a program These jobscripts consist of three parts: 1. Shebang <!-- .element: class="fragment" data-fragment-index="1" --> 2. Job Parameters <!-- .element: class="fragment" data-fragment-index="2" --> 3. Actual Job Code <!-- .element: class="fragment" data-fragment-index="3" --> <!--v--> <!-- .slide: data-auto-animate --> ## SLURM Job Manager <!-- .element: data-id="code-animation"--> #### Example <!--v--> <!-- .slide: data-auto-animate --> ## SLURM Job Manager <!-- .element: data-id="code-animation"--> #### Example ```sh #!/usr/bin/zsh ``` <!-- .element: data-id="code-animation"--> <!--v--> <!-- .slide: data-auto-animate --> ## SLURM Job Manager <!-- .element: data-id="code-animation"--> #### Example ```sh #!/usr/bin/zsh ### Job Parameters #SBATCH --cpus-per-task=8 #SBATCH --time=00:15:00 #SBATCH --job-name=example_job #SBATCH --output=stdout.txt #SBATCH --account=<project-id> ``` <!-- .element: data-id="code-animation"--> <!--v--> <!-- .slide: data-auto-animate --> ## SLURM Job Manager <!-- .element: data-id="code-animation"--> #### Example ```sh #!/usr/bin/zsh ### Job Parameters #SBATCH --cpus-per-task=8 #SBATCH --time=00:15:00 #SBATCH --job-name=example_job #SBATCH --output=stdout.txt #SBATCH --account=<project-id> ### Program Code echo "Hello SLURM" ``` <!-- .element: data-id="code-animation"--> <!--v--> <!-- .slide: data-auto-animate --> ## SLURM Job Manager <!-- .element: data-id="code-animation"--> #### Example - Save the file - Submit the job <!-- .element: class="fragment" data-fragment-index="1" --> ```sh > sbatch testjob.sh ``` <!-- .element: class="fragment" data-fragment-index="2" --> - Check its state <!-- .element: class="fragment" data-fragment-index="3" --> ```sh > squeue --me JOBID PARTITION NAME USER ST TIME NODES 12345678 c23ms example_job AB123456 R 0:02 1 ``` <!-- .element: class="fragment" data-fragment-index="4" --> <!--v--> <!-- .slide: data-auto-animate --> ## SLURM Job Manager <!-- .element: data-id="code-animation"--> #### Common Parameters - Number of cores: **-c /--cpus-per-task \<numpcus>** - Memory: **-m /--mem=\<amount>G** - Human readable Job name: **-J /--job-name** - Reporting File: **-o /--output=\<filename>** - Runtime: **-t /--time=d-hh:mm:ss** - Account: **-A /--account=\<project>** - GPUs: **--gres=gpu:\<type>:\<amount>** <!--v--> <!-- .slide: data-auto-animate --> ## SLURM Job Manager <!-- .element: data-id="code-animation"--> #### Essential Commands ```sh # Submit a job sbatch myjob.sh # Check the queue squeue --me # your jobs only squeue --me --start # estimated start time # Cancel jobs scancel <JOB-ID> scancel --me # cancel all your jobs ``` <!--v--> <!-- .slide: data-auto-animate --> ## SLURM Job Manager <!-- .element: data-id="code-animation"--> #### Array Jobs Run the same script over many inputs — one submission, many jobs: ```bash [1|2|3] #SBATCH --array=1-100 input_file="data/sample_${SLURM_ARRAY_TASK_ID}.txt" python train.py --input "$input_file" --seed "$SLURM_ARRAY_TASK_ID" ``` - `$SLURM_ARRAY_TASK_ID` — unique index per job · `--array=0-99%10` caps 10 running at once <!--v--> <!-- .slide: data-auto-animate --> ## SLURM Job Manager <!-- .element: data-id="code-animation"--> #### Job Dependencies — Chaining Jobs Submit a pipeline without waiting for each step to finish: ```bash [1|2|3] jid1=$(sbatch --parsable preprocess.sh) jid2=$(sbatch --dependency=afterok:$jid1 --parsable train.sh) sbatch --dependency=afterok:$jid2 evaluate.sh ``` `afterok:ID` waits for success · `afterany:ID` waits for any end · `afternotok:ID` waits for failure <!--v--> <!-- .slide: data-auto-animate --> ## SLURM Job Manager <!-- .element: data-id="code-animation"--> #### Interactive Jobs and Accounting ```sh # Request an interactive session (great for testing) salloc --gres=gpu:1 -n 24 -t 1:00:00 # 24 cores + 1 GPU for 1 hour # Shell redirects to the compute node; job ends when you exit nvidia-smi # check GPU utilization and memory on the node you're on # Show past and running job details sacct -S $(date -I --date="yesterday") # all jobs since yesterday # RWTH-specific: check quota usage r_wlm_usage ``` <!--v--> <!-- .slide: data-auto-animate --> ## SLURM Job Manager <!-- .element: data-id="code-animation"--> 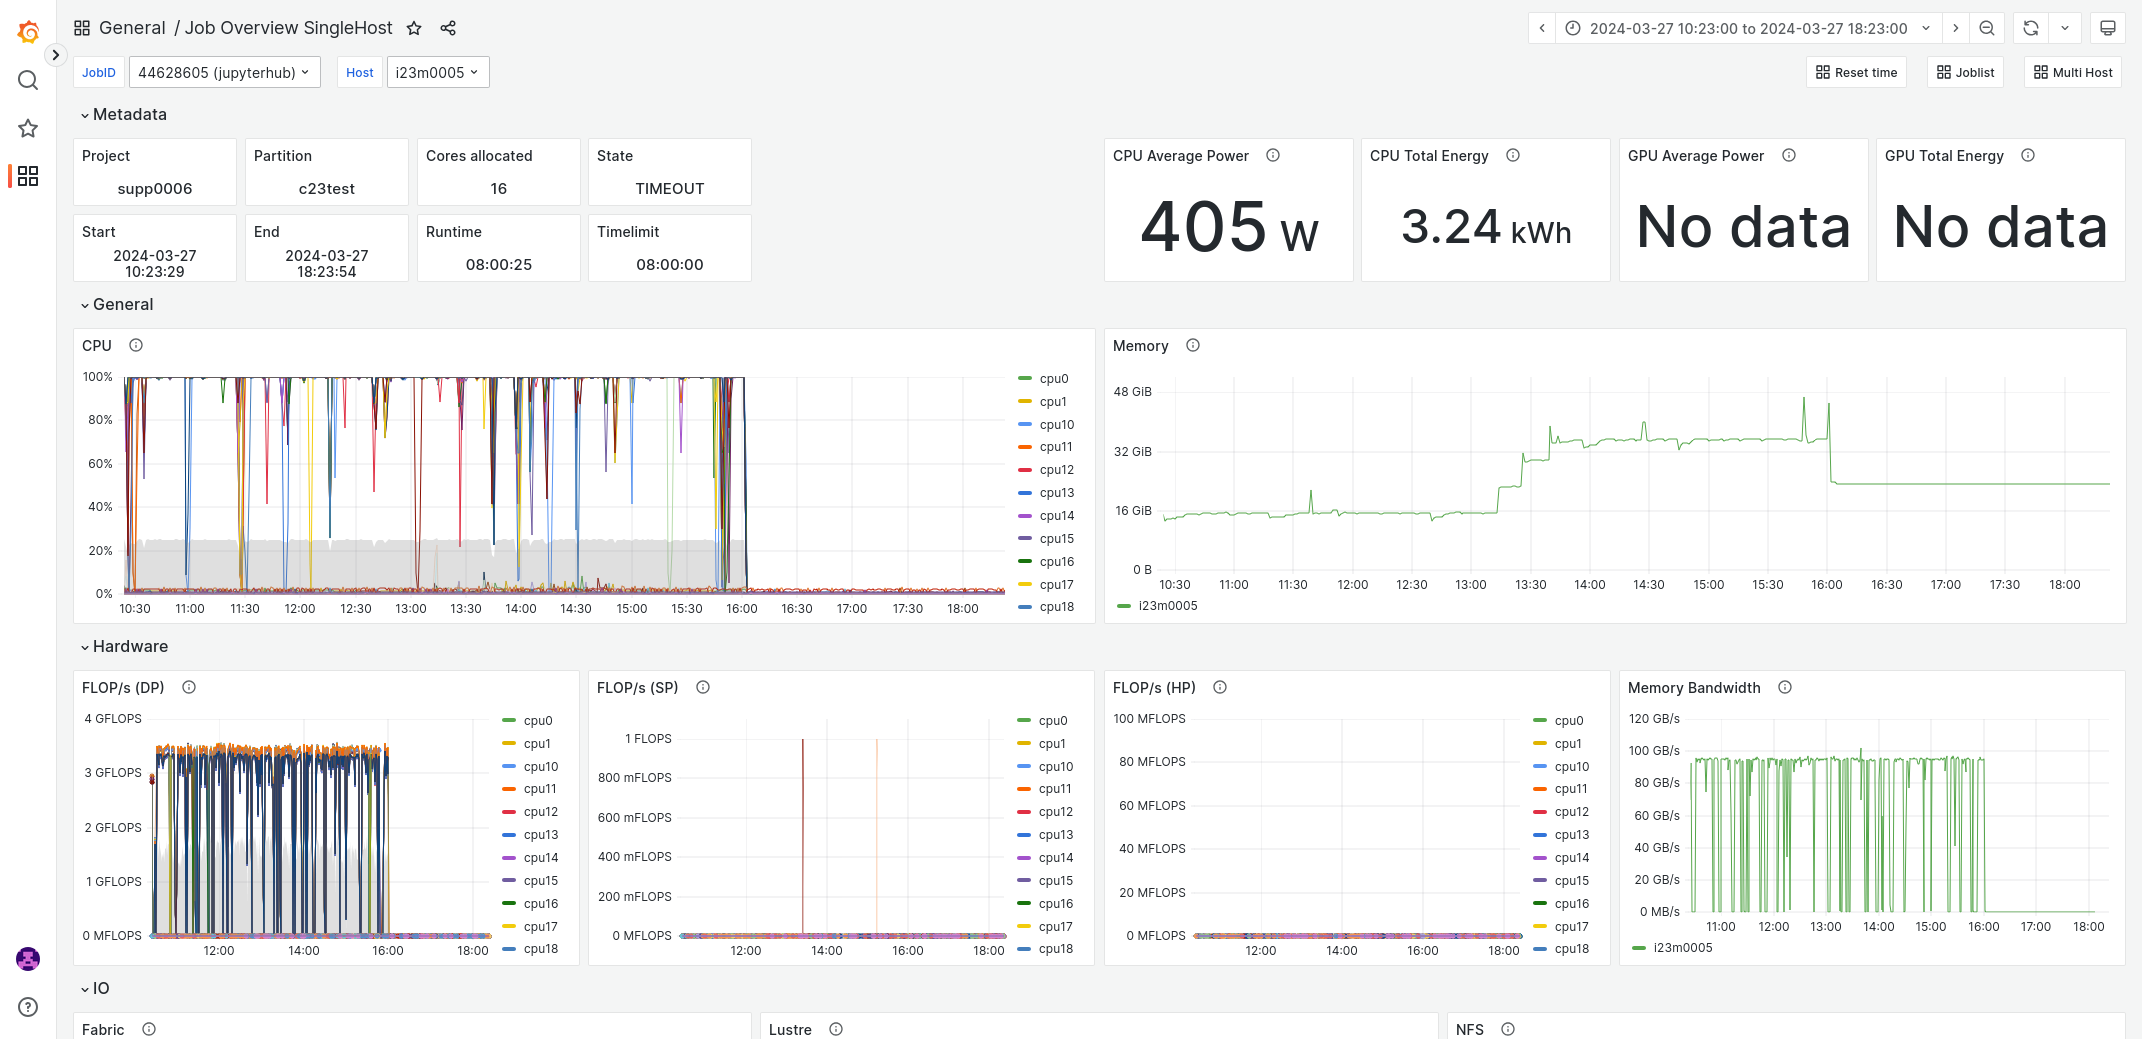 --- <!-- .slide: data-auto-animate --> ## Compute Time Application <!-- .element: data-id="code-animation"--> - Resources are measured in core hours (core-h) <!-- .element: class="fragment" data-fragment-index="1" --> - A Macbook Pro has roughly 70k core-h/year <!-- .element: class="fragment" data-fragment-index="2" --> - The smallest project already guarantees 360k core-h <!-- .element: class="fragment" data-fragment-index="3" --> - Estimate your needs based on previous work <!-- .element: class="fragment" data-fragment-index="4" --> - Write and submit your application! <!-- .element: class="fragment" data-fragment-index="5" --> <!--v--> ### The HPC Performance Pyramid HPC resources in Germany are arranged hierarchically: - **Tier-0**: PRACE and EuroHPC (European scale) - **Tier-1**: Gauss Center for Supercomputing (GCS, JSC, HLRS, LRZ) - **Tier-2**: Supra-regional HPC centres — NHR (includes RWTH CLAIX) - **Tier-3**: Regional HPC centres — RWTH local projects <!--v--> ### Which project type? | Project | Core-h / year | Tier | Who | |---|---|---|---| | **RWTH Thesis** | < 0.048 Mio | 3 | Bachelor / Master thesis | | **RWTH Lecture** | < 0.048 Mio | 3 | Teaching & courses | | **RWTH Small** | < 0.36 Mio | 3 | Any RWTH/UKA researcher | | **NHR Normal** | 1 – 8 Mio | 2 | NRW universities (+ 2 Mio GPU-h) | | **NHR Large** | 12 – 50 Mio | 2 | Via competitive review (+ 4 Mio GPU-h) | | **PREP / Prep-up** | starter quota | — | Porting, testing, first steps | > Not eligible? → [WestAI](https://westai.de/) is an option for AI/ML workloads. <!--v--> ### NHR Project Types | | PREP | Normal | Large | |---|---|---|---| | **Scale** | Starter quota | up to 8 Mio Core-h/year | 12 – 50 Mio Core-h/year | | **GPUs** | — | max. 2 Mio GPU-h | max. 4 Mio GPU-h | | **Duration** | max. 6 months | continuous, renewable | fixed term | | **Review** | none | technical + scientific | competitive | | **Deadlines** | rolling | rolling | OCT · JAN · APR · JUL | <!--v--> ### NHR Normal — Application Process 1. Submit application (< 8 Mio Core-h) 2. **Technical Review** (< 2 weeks) — issues? resubmit with fixes 3. **Start contingent** provisioned (0.24 Mio Core-h/year) — you can start computing now 4. **Scientific Review** (< 5 weeks) 5. Conditional Allocation → **RAB Decision** → Final resource allocation > The start contingent lets you begin work before the scientific review completes. <!--v--> ### Acknowledgement (RWTH/JARA) Cite the resources in your papers: **Short:** *Computations were performed with computing resources granted by RWTH Aachen University under project \<ID\>.* **NHR-funded projects:** use the full text from [nhr-verein.de/unsere-partner](https://www.nhr-verein.de/unsere-partner) — names NHR4CES, your project number, and the funding bodies. --- <!-- .slide: data-auto-animate --> ## Tips and Tricks <!--v--> ### VS Code on the Cluster Install the **Remote - SSH** extension, then connect using your `~/.ssh/config` alias: ```text Host claix HostName login23-1.hpc.itc.rwth-aachen.de User ab123456 ``` - Full IDE — file browser, terminal, git, debugger - Python, Jupyter, and other extensions work remotely - Edit files directly on the cluster — no file transfers needed > Connect to **login nodes** for editing; submit jobs from the integrated terminal. <!--v--> ### Jupyter Notebooks on the Cluster Run the notebook server on a compute node, tunnel the port to your laptop: ```bash [1-2|3|5] salloc -n 4 -t 2:00:00 hostname # note it, e.g. dsr01 jupyter notebook --no-browser --port=8888 ssh -L 8888:dsr01:8888 claix # on your laptop ``` - Open the `localhost:8888/...` URL Jupyter prints, in your local browser - VS Code's Jupyter extension tunnels automatically over Remote-SSH <!--v--> ### Persistent Sessions with tmux SSH sessions die when you disconnect — `tmux` keeps processes running: ```bash [1|2|3|4] tmux new -s work # create a named session # ... run long commands, then disconnect safely ... tmux detach # Ctrl-b d — detach (session stays alive) tmux attach -t work # reattach from any login node ``` - Run interactive jobs or monitoring without fear of losing the session - Split panes: `Ctrl-b %` (vertical) · `Ctrl-b "` (horizontal) - List sessions: `tmux ls` <!--v--> ### Python Environments on the Cluster Don't install packages globally — use isolated environments: ```bash [1|2|3|4] module load Miniconda3 # load conda (check: module avail Miniconda) conda create -n myenv python=3.11 # create environment conda activate myenv # activate pip install -r requirements.txt # install packages ``` In your job script, always activate the environment explicitly: ```bash module load Miniconda3 conda activate myenv python train.py ``` --- ## Questions? <br> **Richard Polzin** _rpolzin@ukaachen.de_ [richardpolzin.com](https://richardpolzin.com) · [help.itc.rwth-aachen.de](http://help.itc.rwth-aachen.de) · [idm.rwth-aachen.de/selfservice](https://idm.rwth-aachen.de/selfservice/)